
“], “filter”: { “nextExceptions”: “img, blockquote, div”, “nextContainsExceptions”: “img, blockquote”} }”>
One of the most amazing things about training legs is the endless ability for the body to adapt to ever-tougher, more-challenging stimulus. A session that may have seemed really tough a month ago may be a breeze for you now.
That means you need to keep stepping up your efforts in order to continue seeing the changes you want. How? Samantha Parker, C-IAYT, E-RYT 500, a yoga, kinesiophobia cognitive and movement specialist, and CEO of Neoteric Movement Systems, has the answer in the form of a three-level leg workout. Combining the tenets of high-intensity interval training (HIIT) with four ultra-effective thigh-focused movements, you’ll sculpt every inch of your legs in just 20 minutes!
The 20-Minute HIIT Leg Workout
For this, you’ll need a timer and possibly a partner — if not, a clock with a second hand will do, too. Start with a five-minute warm-up, which can be a light, steady pace on the elliptical, rower or treadmill. A dynamic warm-up stretching routine is another option.
You’ll start on “Level 1” for the workout, doing each exercise for 30 seconds, resting one minute, then moving on to the next. Continue through the circuit until 18 minutes has elapsed — by then, you’ll have done the circuit three times through. “In the beginning, this 30-seconds-on, one-minute-recovery pattern may seem easy, but I promise — it won’t be so easy once the five-minute mark rolls around,” Parker warns.
After your circuits, jump on a cardio machine for a two-minute slow-pace cool-down and you’re done. Once you feel you’ve mastered the Level 1 moves, you can step up to Level 2, eventually working your way up to the advanced Level 3 HIIT leg workout exercises as listed below.
| Exercise | Sets | Time |
| Alternating Lunge | 3 | 30 seconds |
| Bodyweight Squat | 3 | 30 seconds |
| Bridge | 3 | 30 seconds |
| Alternating Step-Up | 3 | 30 seconds |
Alternating Lunge
Level 1: From a standing position, take a long step forward with one foot and lower your hips down toward the floor as you bend your front knee. Your back leg should be stretched out behind you, knee elevated off the floor and balanced on your toes. Your torso should remain upright. From the deep lunge, press forcefully through your front foot to push your body up and back to the standing position. Next, step forward with the other foot into a lunge, continuing the pattern.
Level 2: Perform alternating lunges as described, but as you return from the lunge to a standing position, come onto the ball of your forward foot first, which engages the calves more in the movement.
Level 3: Instead of stepping forward into your lunges, do jumping alternating lunges, where from a lunge position, you propel yourself straight up into the air and switch your legs before landing and lowering yourself into a lunge with your opposite leg forward.
Bodyweight Squat

Level 1: Assume a stance just an inch or so outside hip width, toes slightly turned out, with your hands on your hips or across your chest, head up. Keeping your abs tight and torso erect, bend at the knees and hips to slowly lower your body, pausing when your legs reach a 90-degree angle. From there, drive through your heels, extending at your hips and knees until you return to a standing position. “To learn the proper depth, try placing a chair or stand a couple of feet away from a wall with your back to it — as you squat down, try touching your glutes to the wall or sit down in the chair, then stand up,” Parker suggests.
Level 2: Perform the squat as described above, except as you stand up, come up onto your toes as you also reach with your arms straight overhead.
Level 3: Perform jump squats, focusing on landing softly and going right into your next squat. You can take this up an additional notch by turning yourself in the air, either a quarter to half turn before landing and repeating.
Bridge
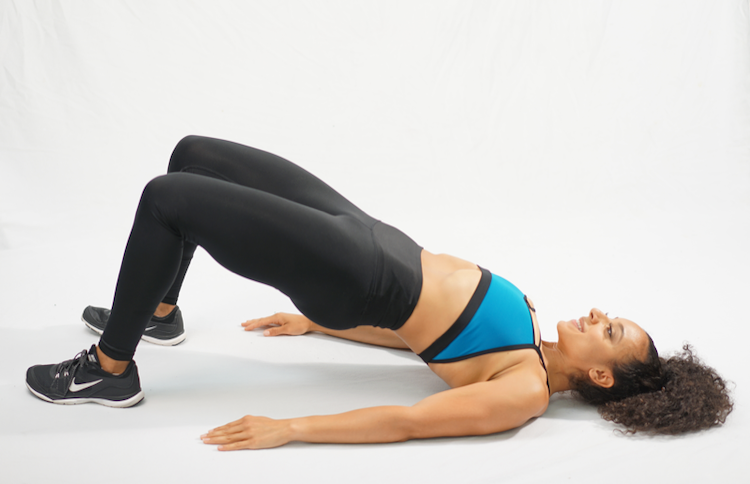
Level 1: Lie on your back, feet flat on the floor, ankles directly underneath your knees, and your arms on the floor and at your sides. Next, lift your hips off the floor by pushing through your heels, creating a straight line from your knees to your shoulders, which are supporting your upper body on the floor. “Make sure the weight is centered on your shoulders, not your neck,” Parker cautions. Hold this position for 30 seconds.
Level 2: Add an alternating leg lift, remaining in the bridge while straightening one knee, then putting that foot back down to the floor and straightening the other, going back and forth for the 30-second duration.
Level 3: Assume the bridge position with one foot supported on a chair or bench, the other leg elevated. You’ll lift and lower your body for 15 seconds, then switch to the opposite leg for the next 15 seconds.
Alternating Step-Up

Level 1: Stand in front of a knee-to-hip-high step, bench or platform. Starting with your feet in a comfortable shoulder-width stance, step forward with one leg on the step and drive through that thigh to propel your body upward. Bring the trailing leg to the top of the step and stand atop it, then step back with one leg, then the other to get to the floor. Repeat, switching your lead leg on each step.
Level 2: As you step up, lift the trailing leg up behind you instead of bringing it onto the platform, flexing your glute. Step back down to the floor with that trailing leg, following with the leg atop the step. Repeat with the opposite leg leading the way.
Level 3: Add a three-count pulse for each leg lift to the rear.