“], “filter”: { “nextExceptions”: “img, blockquote, div”, “nextContainsExceptions”: “img, blockquote”} }”>
Get full access to Outside Learn, our online education hub featuring in-depth fitness and nutrition courses and more than 2,000 instructional videos when you
>”,”name”:”in-content-cta”,”type”:”link”}}”>sign up for Outside+.
Functional workouts tend to allow for some creativity — which is perfect when you find yourself trying to figure out how to train around a freak injury.
That’s the position certified health coach, personal trainer and IT health-care consultant Kelly Von Schleis found herself in following an Alaskan adventure this spring. “I was on a heli-skiing trip and ended up breaking my foot in four places,” she says. Relentlessly active, she set out to figure out the best way to stay in shape while recovering from her surgery in April.
“I became very focused on identifying the types of workouts I could still perform, since I was restricted from putting weight on my foot post-surgery — so I decided to add extra emphasis on my arm workouts and core-strengthening exercises,” she says. “Since my injury, I’ve been raking in the compliments on my arms, so I think I’ve come across something special here.”
The following functional workout crushes boredom and delivers pulse-pounding action with three circuits made up of combination-style exercises. You’ll do multiple related movements within each repetition — for instance, incline push-ups with an explosive “up” phase or bench dips that add in a one-leg-at-a-time knee crunch.
“Women often worry about building ‘too much muscle’ in their arms — and I’ll admit, I’m one of them — but if you keep your reps high, around 12 to 15 per set, you focus more on muscle tightening and giving them shape,” she says. “However, I know some women need to build some lean muscle in their arms as a foundation, so I’ve included a second training option where you lower the reps to eight to 10 per set and work closer to the maximum weight you can handle for those reps.”
Equipment Required: Bench (also can be a chair or couch), dumbbells (Von Schleis recommends adjustable dumbbells to maximize results — her favorite are by Core Home Fitness) and an optional sandbag for the triceps dips.
Kelly Von Schleis’ Functional Arm Workout Warm-Up
Suggested Warm-Up: Do the following circuit of bodyweight moves.
| Exercise | Reps |
| Punches Side to Side | 20 (10 per side) |
| Arm Circles (with option to add a squat in between circles) | 10 |
| Jumping Jacks | 20 |
| Plank Shoulder Taps | 20 (10 per shoulder) |
| Mountain Climbers | 20 |
Kelly Von Schleis’ Functional Arm Workout
After your warm-up, you’ll do three circuits made up of combination exercises (two movements per single exercise rep), doing each superset twice through.
Do three rounds of each mini circuit listed below — keep your rest periods between circuits to 30 to 60 seconds (just enough to catch your breath and recover enough strength to continue) if you’re toning and one to two minutes if you’re working with heavier weights and lower rep ranges.
The workout also includes an optional burnout superset at the end pairing three functional faves: woodchops, mountain climbers and planks.
| Exercise | Toning Reps | Building Reps |
| Plyo Incline Push-Up | 10-12 | 8-10 |
| Triceps Dip + Knee Crunch | 12-14 | 8-10 |
| Hammer Curl + Wide Biceps Curl | 12-15 | 8-10 |
| Bird-Dog Row + Triceps Kickback | 12-15 | 8-10 |
| Front Raise + Upright Row | 12-15 | 8-10 |
| Narrow Chest Press + Ab Toe Touch + Skullcrusher | 12-15 | 8-10 |
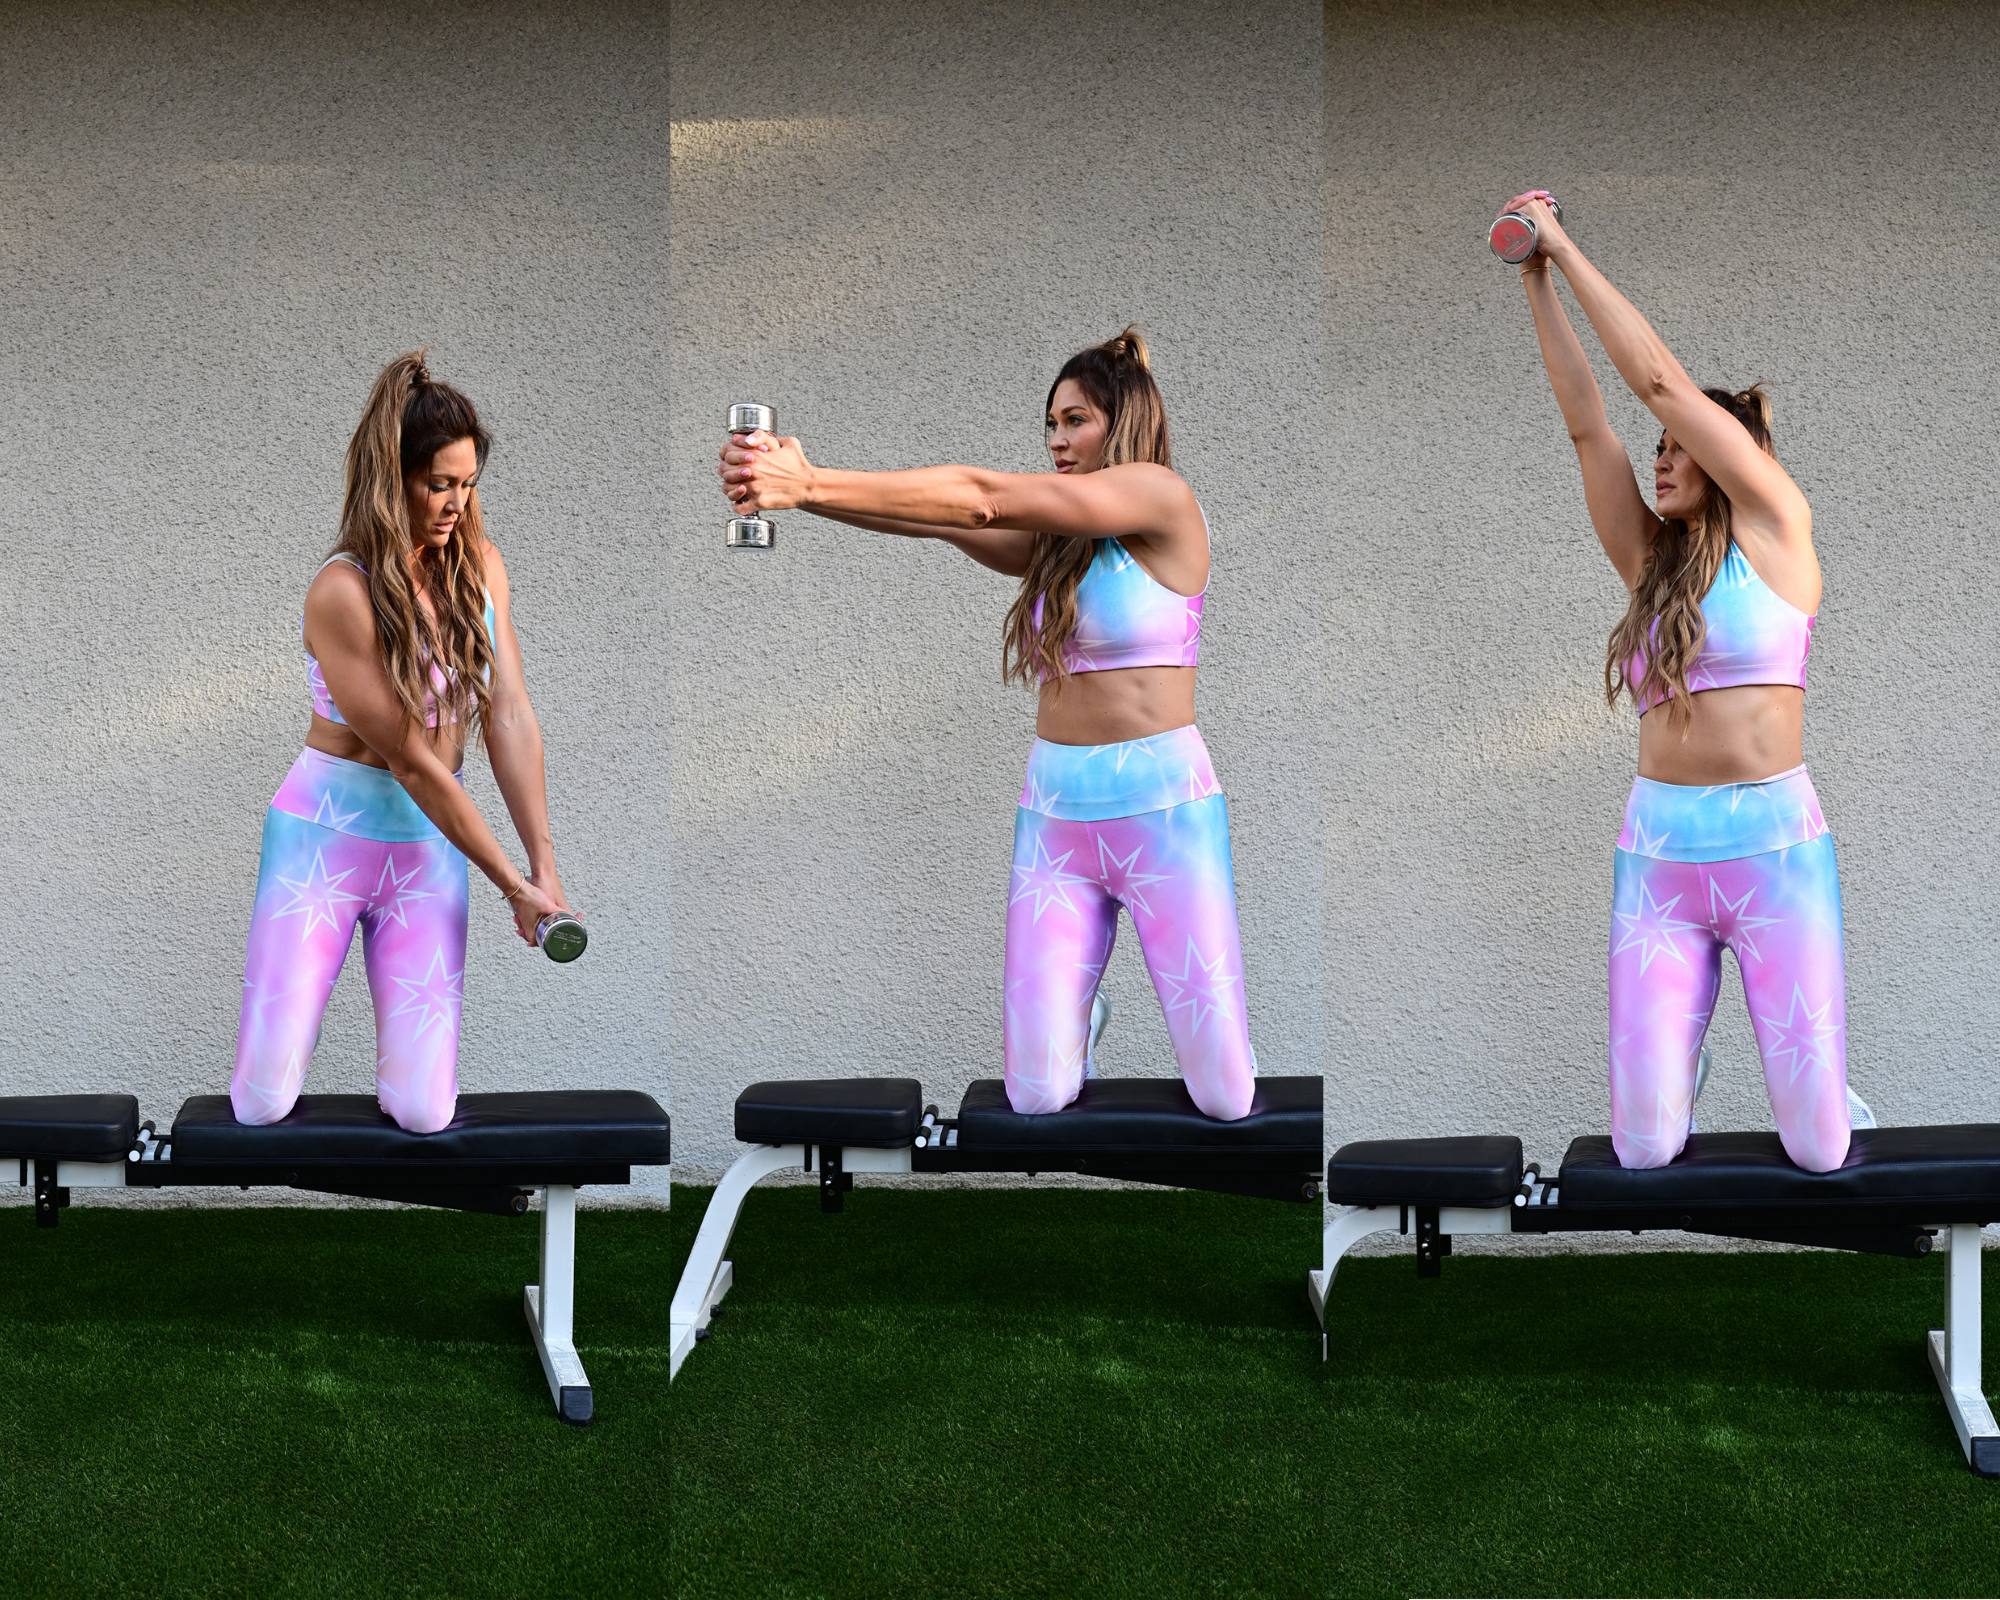
As an optional finisher, Von Schleis suggests a three-round triple set of half-kneeling woodchops (eight to 10 per side for building muscle, 12 to 15 per side for toning), paired with 20 mountain climbers and one minute of plank holds.
Plyo Incline Push-Up
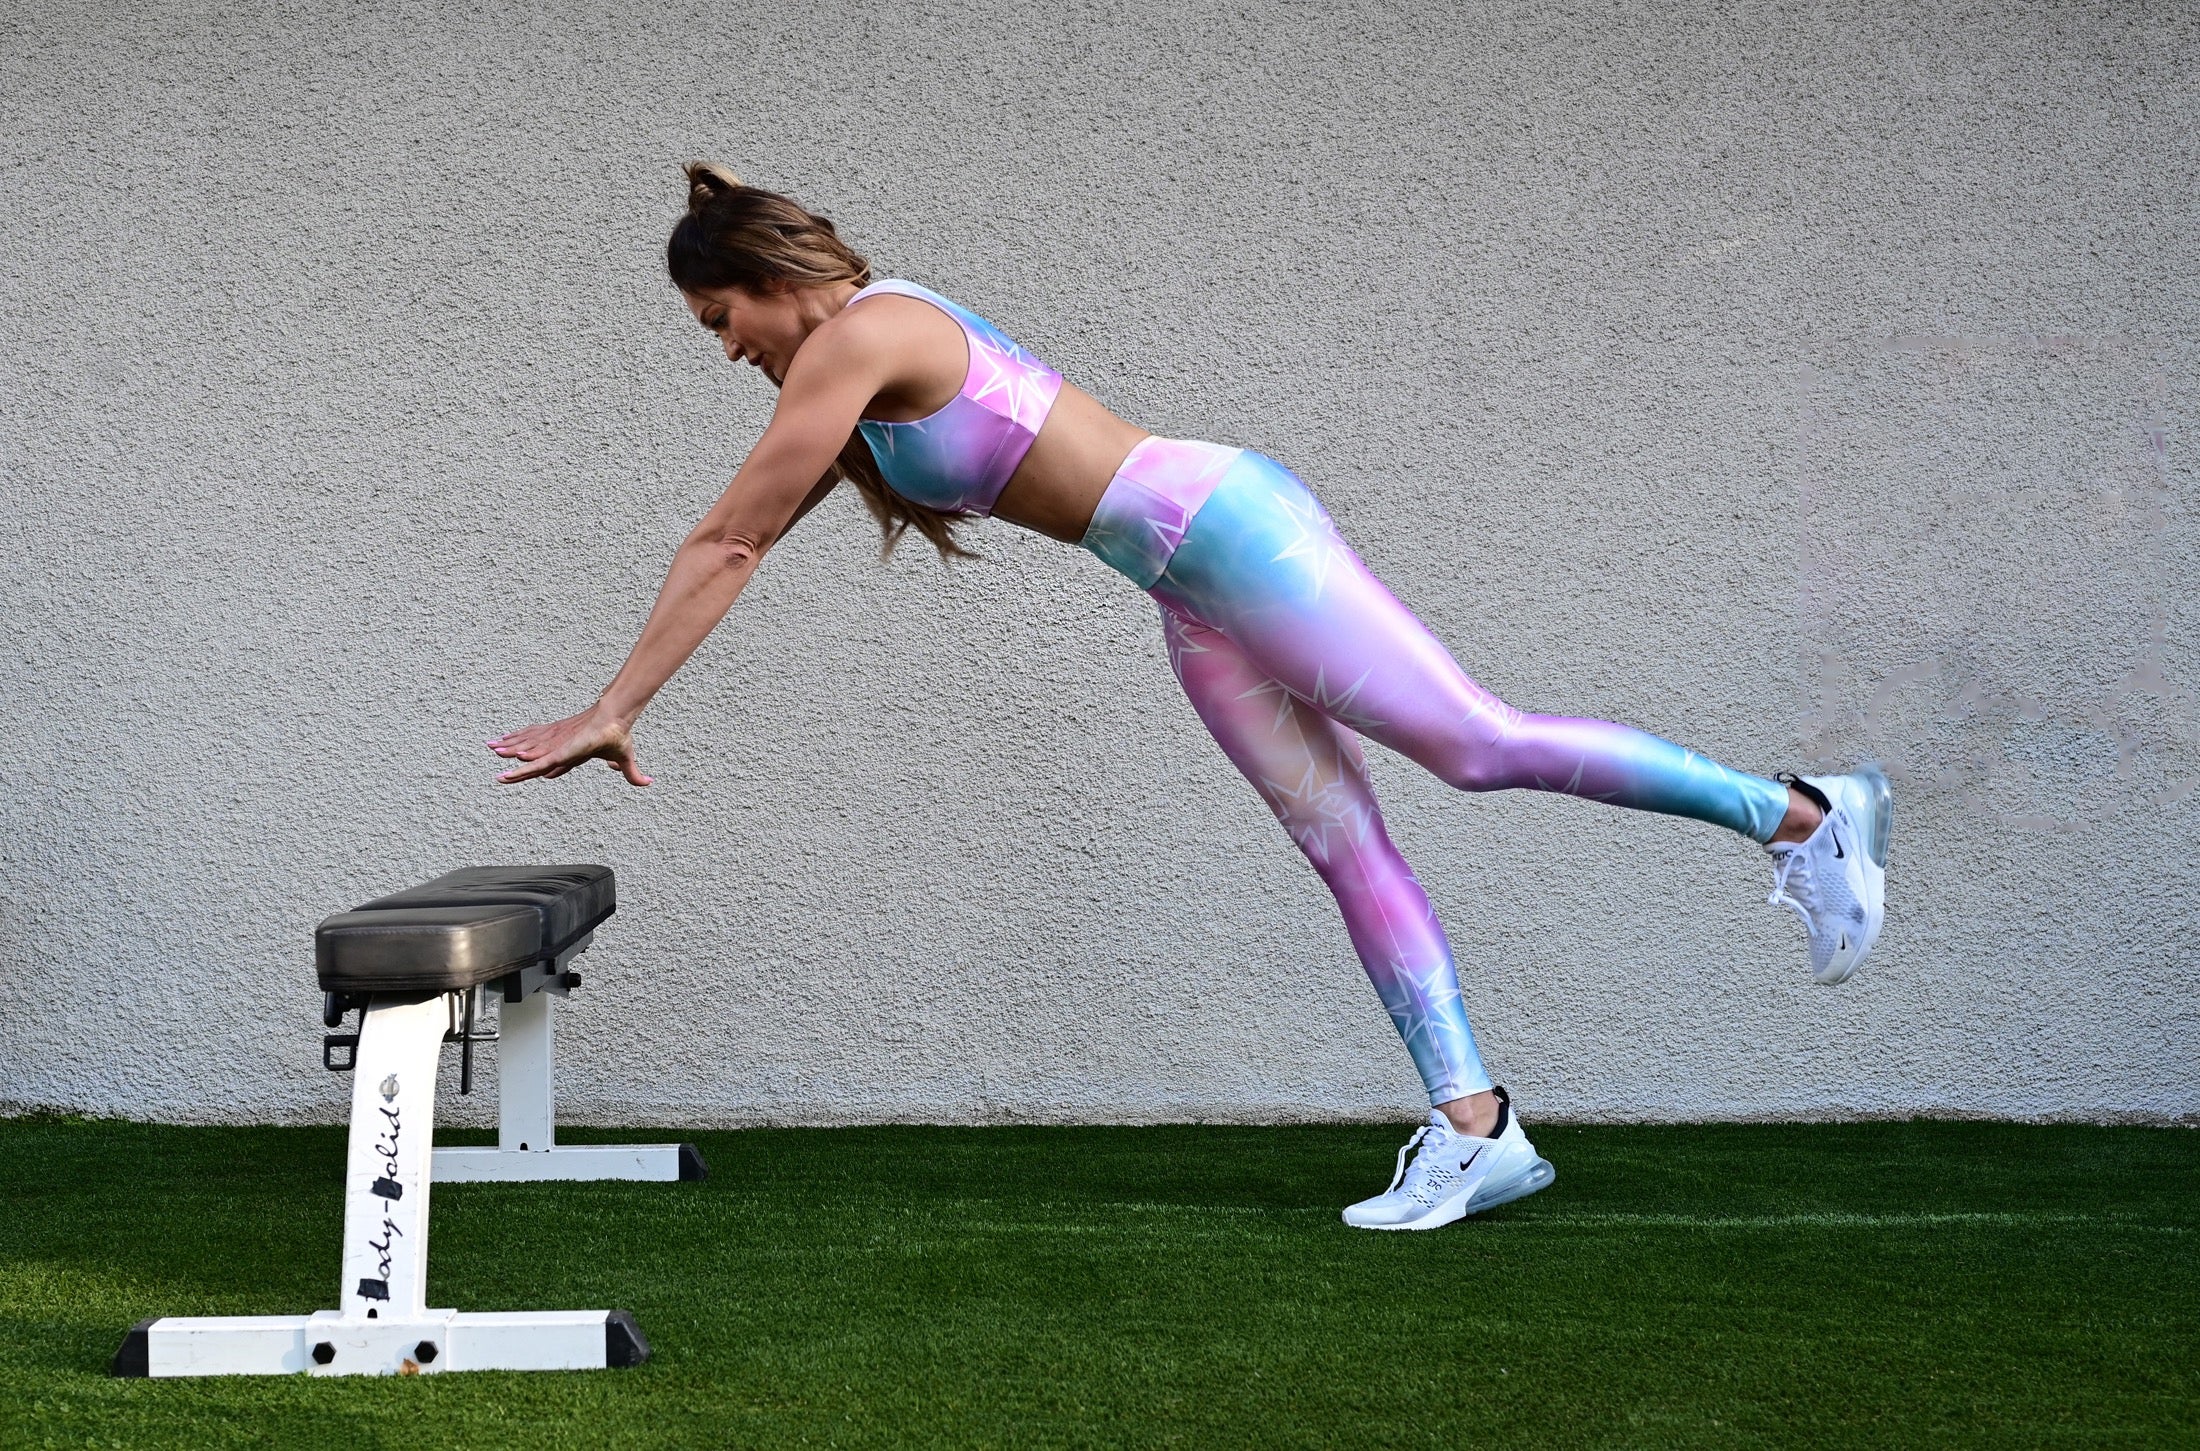

How-To: Using a bench or chair, assume a plank position — feet together, toes on the floor, with your hands wider than shoulder width and flat on the bench and your elbows extended. Keeping your head neutral and abs tight, lower yourself by bending your elbows until your chest gently touches the bench. From there, explode through your palms and launch both hands off the bench into the air while straightening your arms. Land with your elbows soft to help absorb the impact, then begin the next rep.
(Note that in the photos, Von Schleis performs a variation in which she plants one foot and raises the other in the air on each rep — if you do this, you’ll do half the reps per set with one leg planted and then half with the other leg in contact with the floor.)
Kelly’s Pointers: “This advanced plyometric move helps burn fat and build muscle. The steeper the incline, the easier the exercise, so find a chair, bench or ledge that works for your strength levels. Push hard off the base for the explosion, activating all muscles in your arms while maintaining a neutral spine. Your back may tend to want to arch on the push movement, so it’s important to keep it in line. Move to your knees if it becomes too difficult to perform all your reps in the plank position. If you prefer to work more of your triceps as opposed to the focus being mainly on the chest, bring your hands closer together and form a triangle with your fingers.”
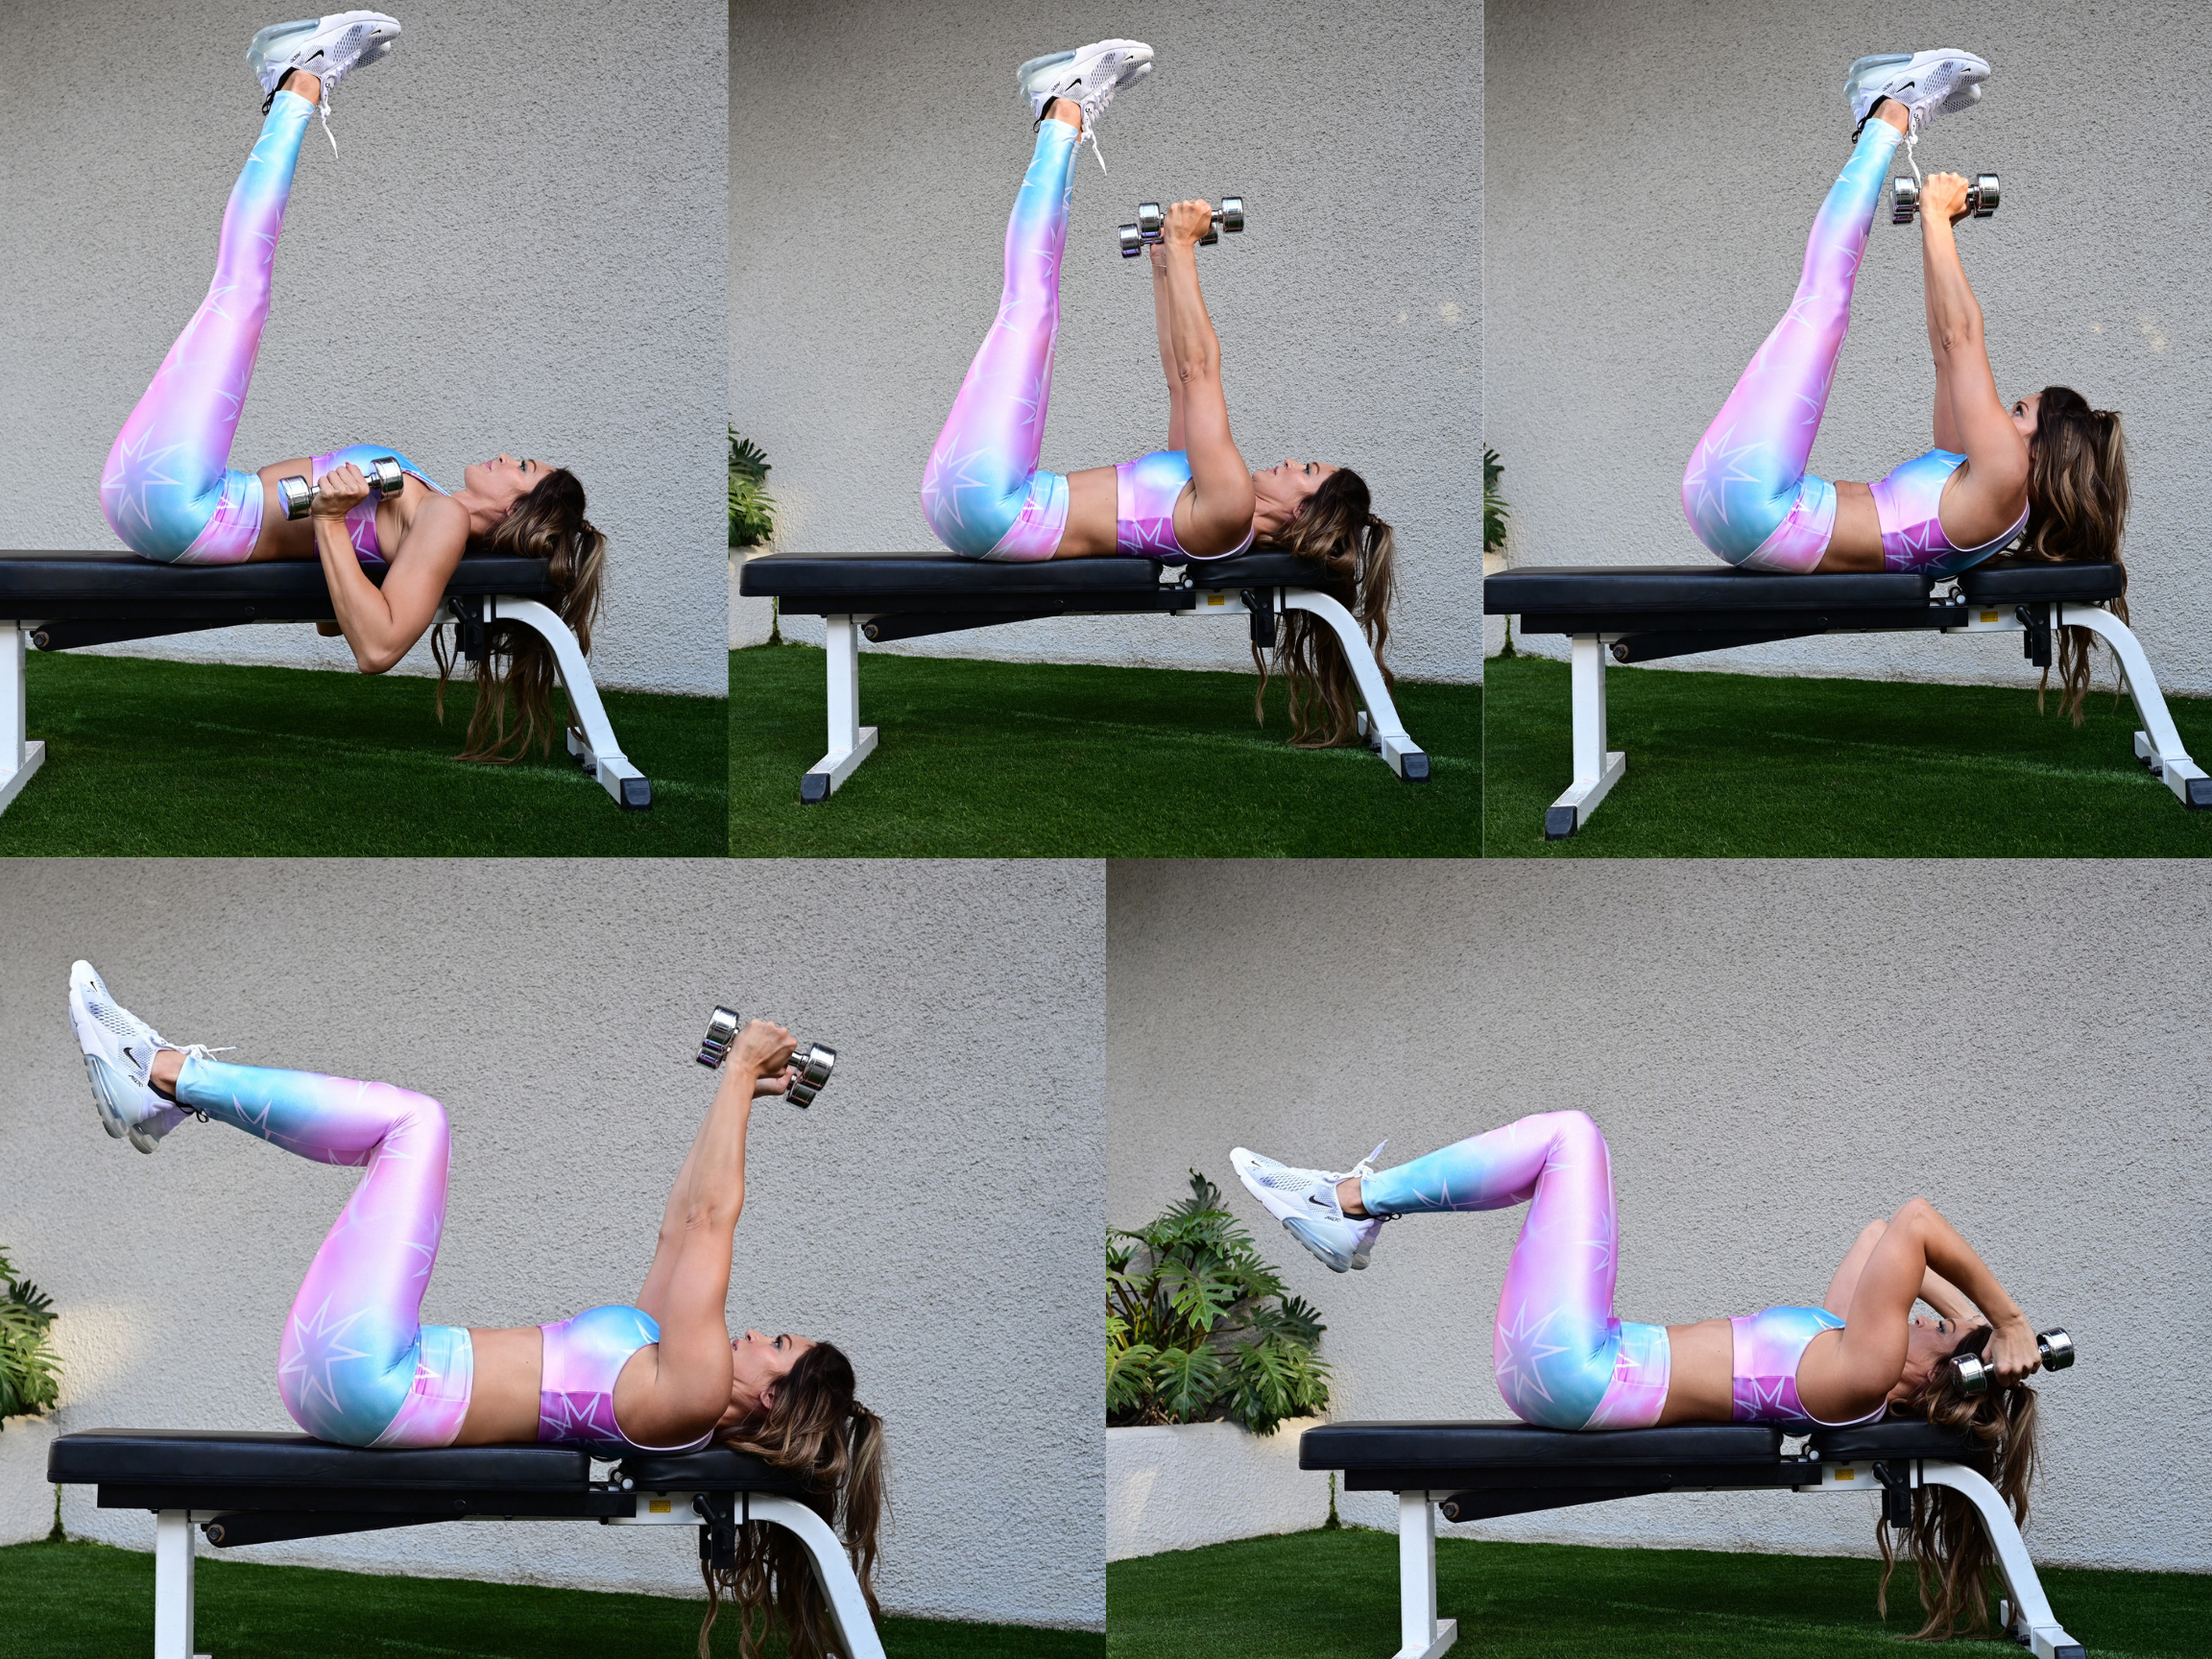
Triceps Dip + Knee Crunch
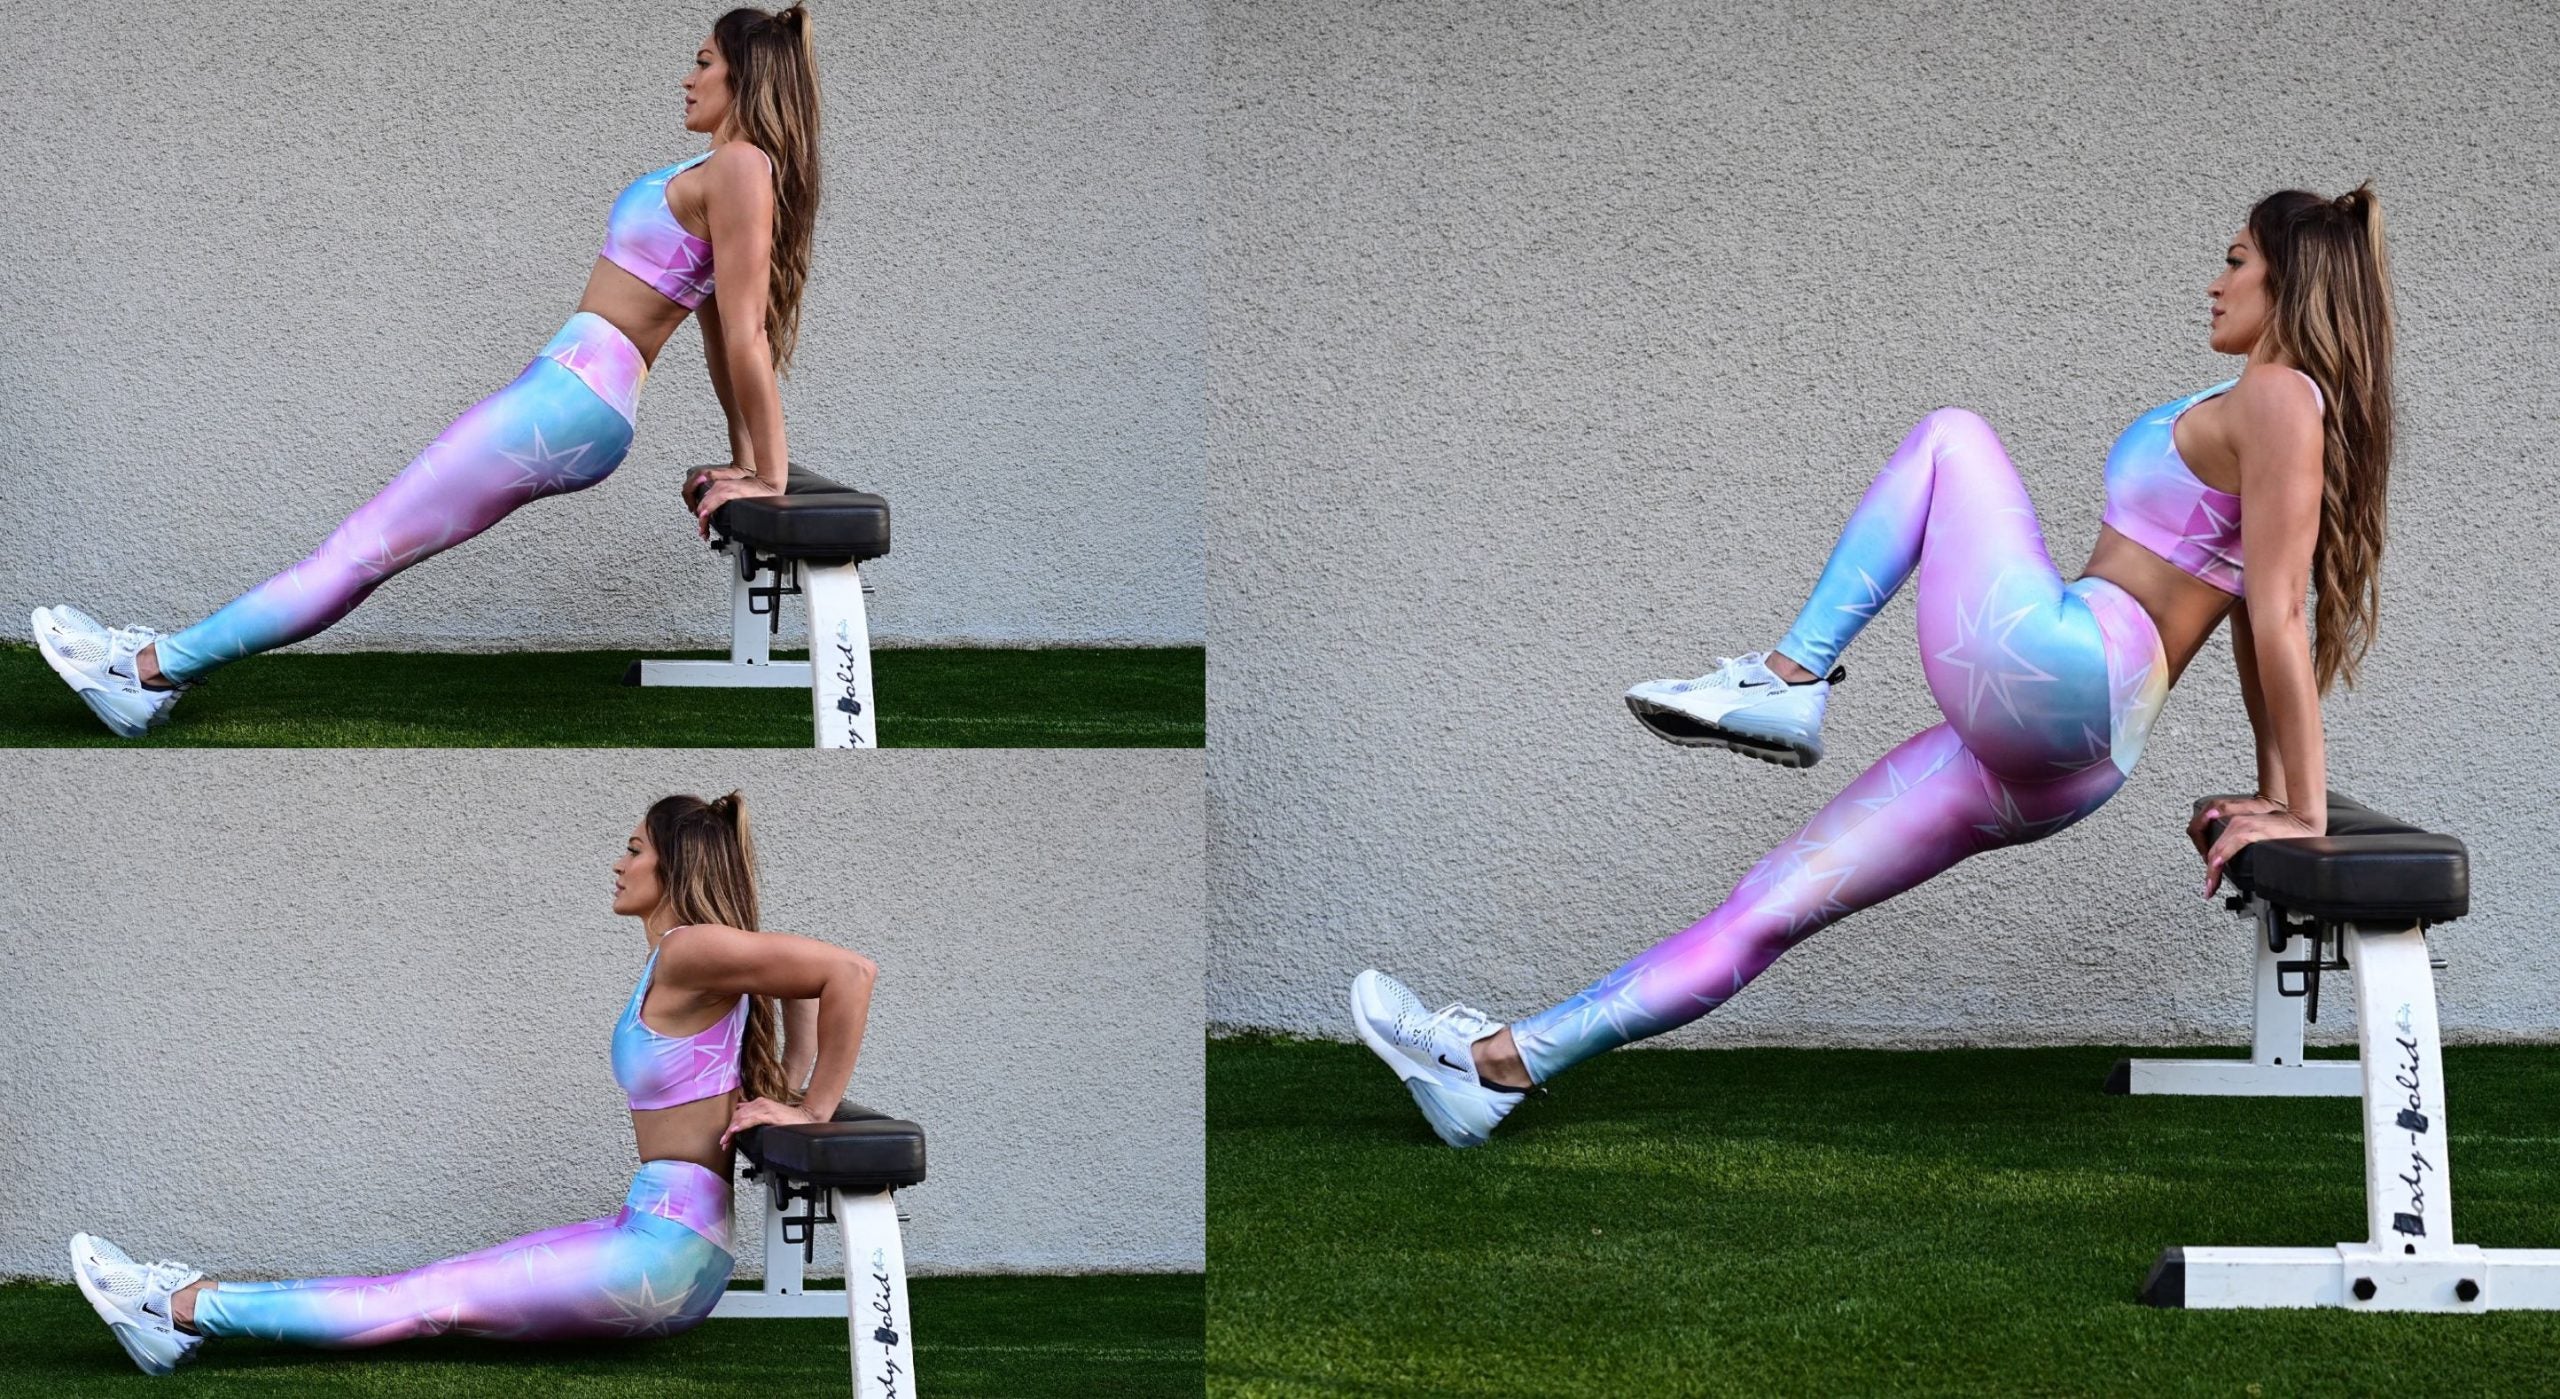
How-To: From a seated position in the center of the bench, place your hands on the edge, palms facing rearward, and lift yourself so your glutes are raised and clear for descent. Bend your elbows to lower your body down until your upper arms are about parallel to the floor, then press your hands into the bench to extend your arms and raise your body back up to the arms-straight position. At the end of each rep, immediately contract your abs as strongly as possible and pick up a single leg to bring it toward your opposite shoulder, holding it for a one- count. Put that leg back down and bring up the other knee to the opposite shoulder, then return it to the floor and begin your next dip.
Kelly’s Pointers: “This has been one of my favorite exercises while rehabbing my foot. Ensure your elbows track straight behind your palms as they bend and not drift out to the sides. You should master this movement using only your bodyweight as resistance, but once you progress in strength, you can add a sandbag on your hips to increase the resistance. Lower your body as slowly as you can — aim for two seconds at first, building up over time to four seconds. Get as low as you can without feeling strain in your shoulders, then press back to your starting position. Accentuate the crunch on the knee lift, too — about one to two seconds per hold.”
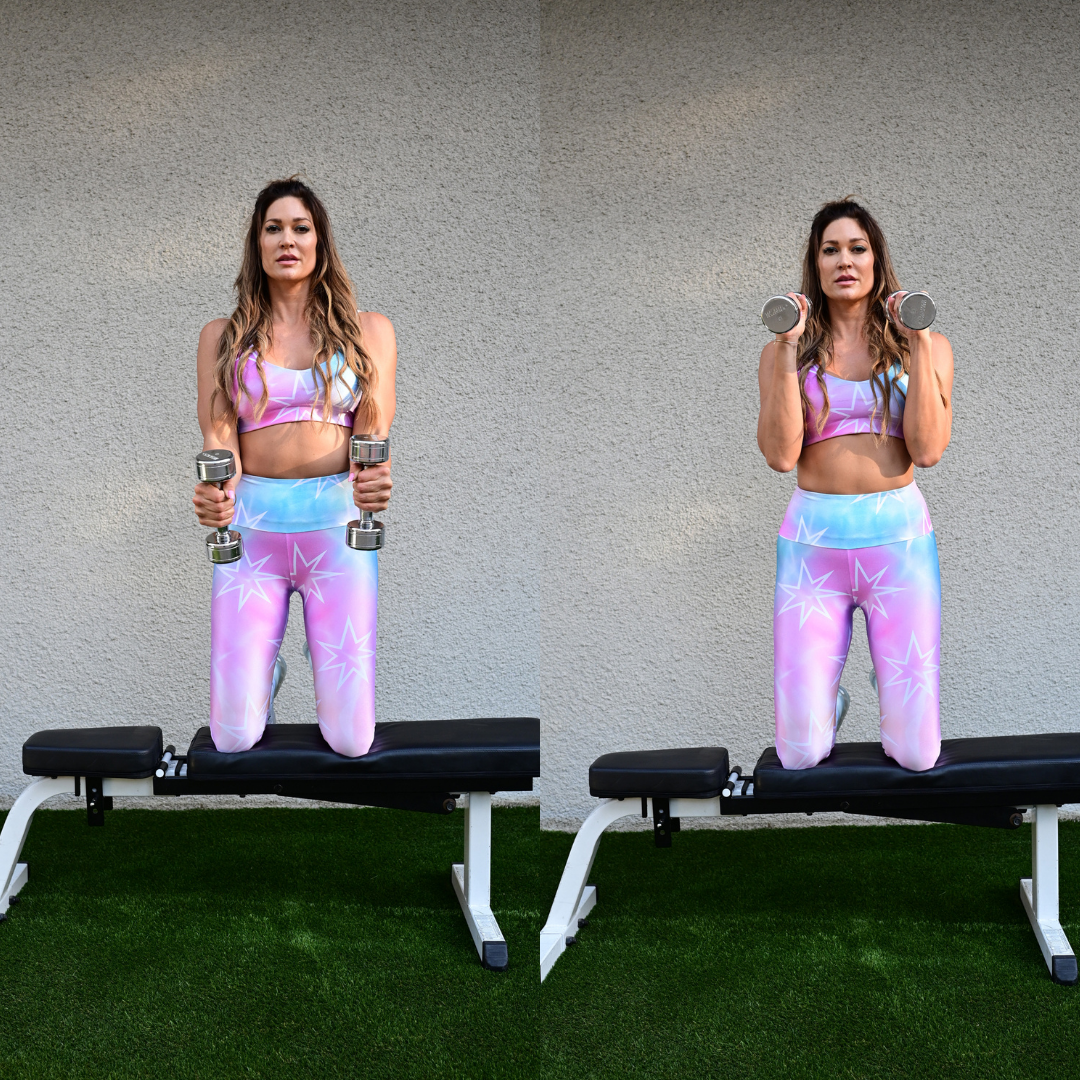
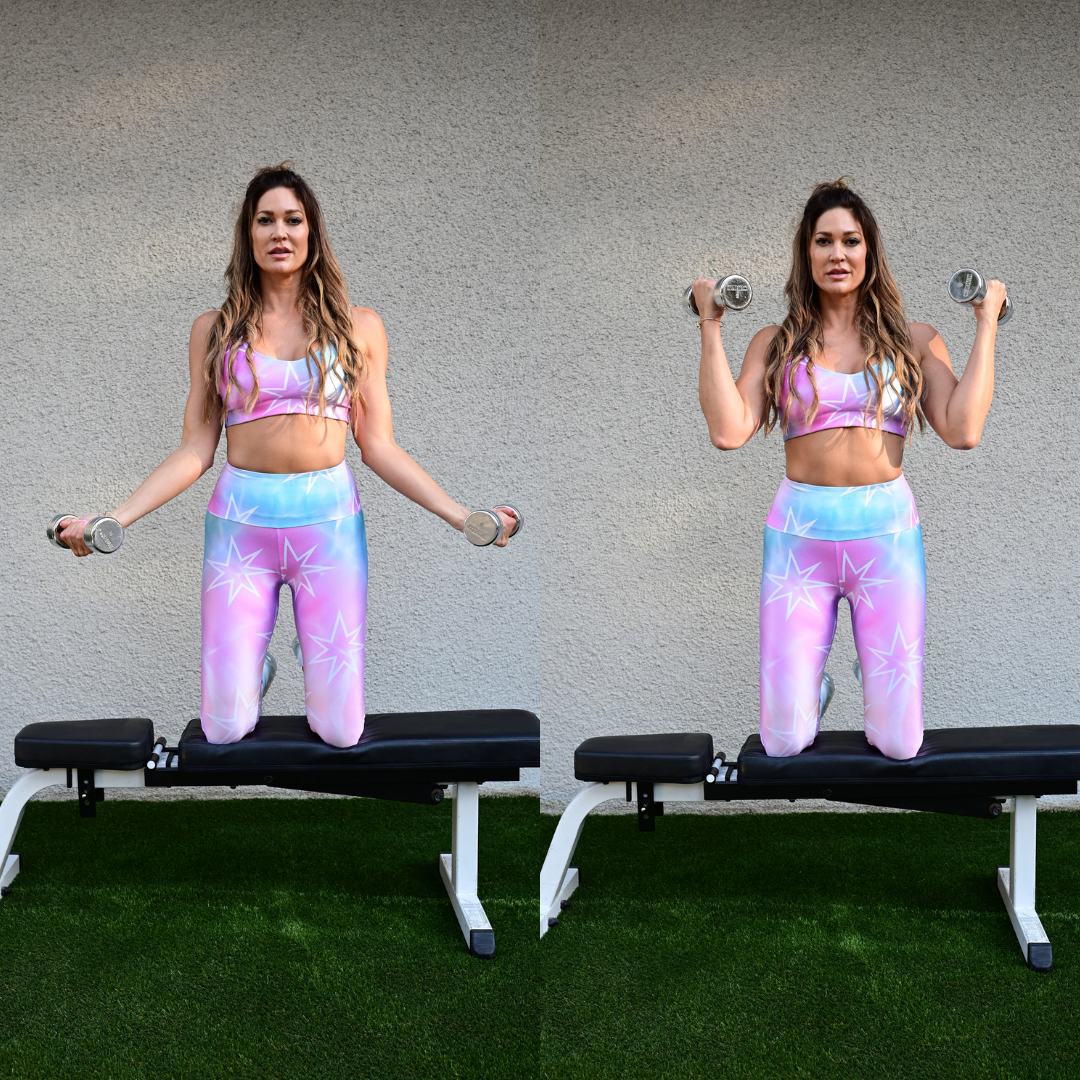
Hammer Curl + Wide Biceps Curl
Bird-Dog Row + Triceps Kickback
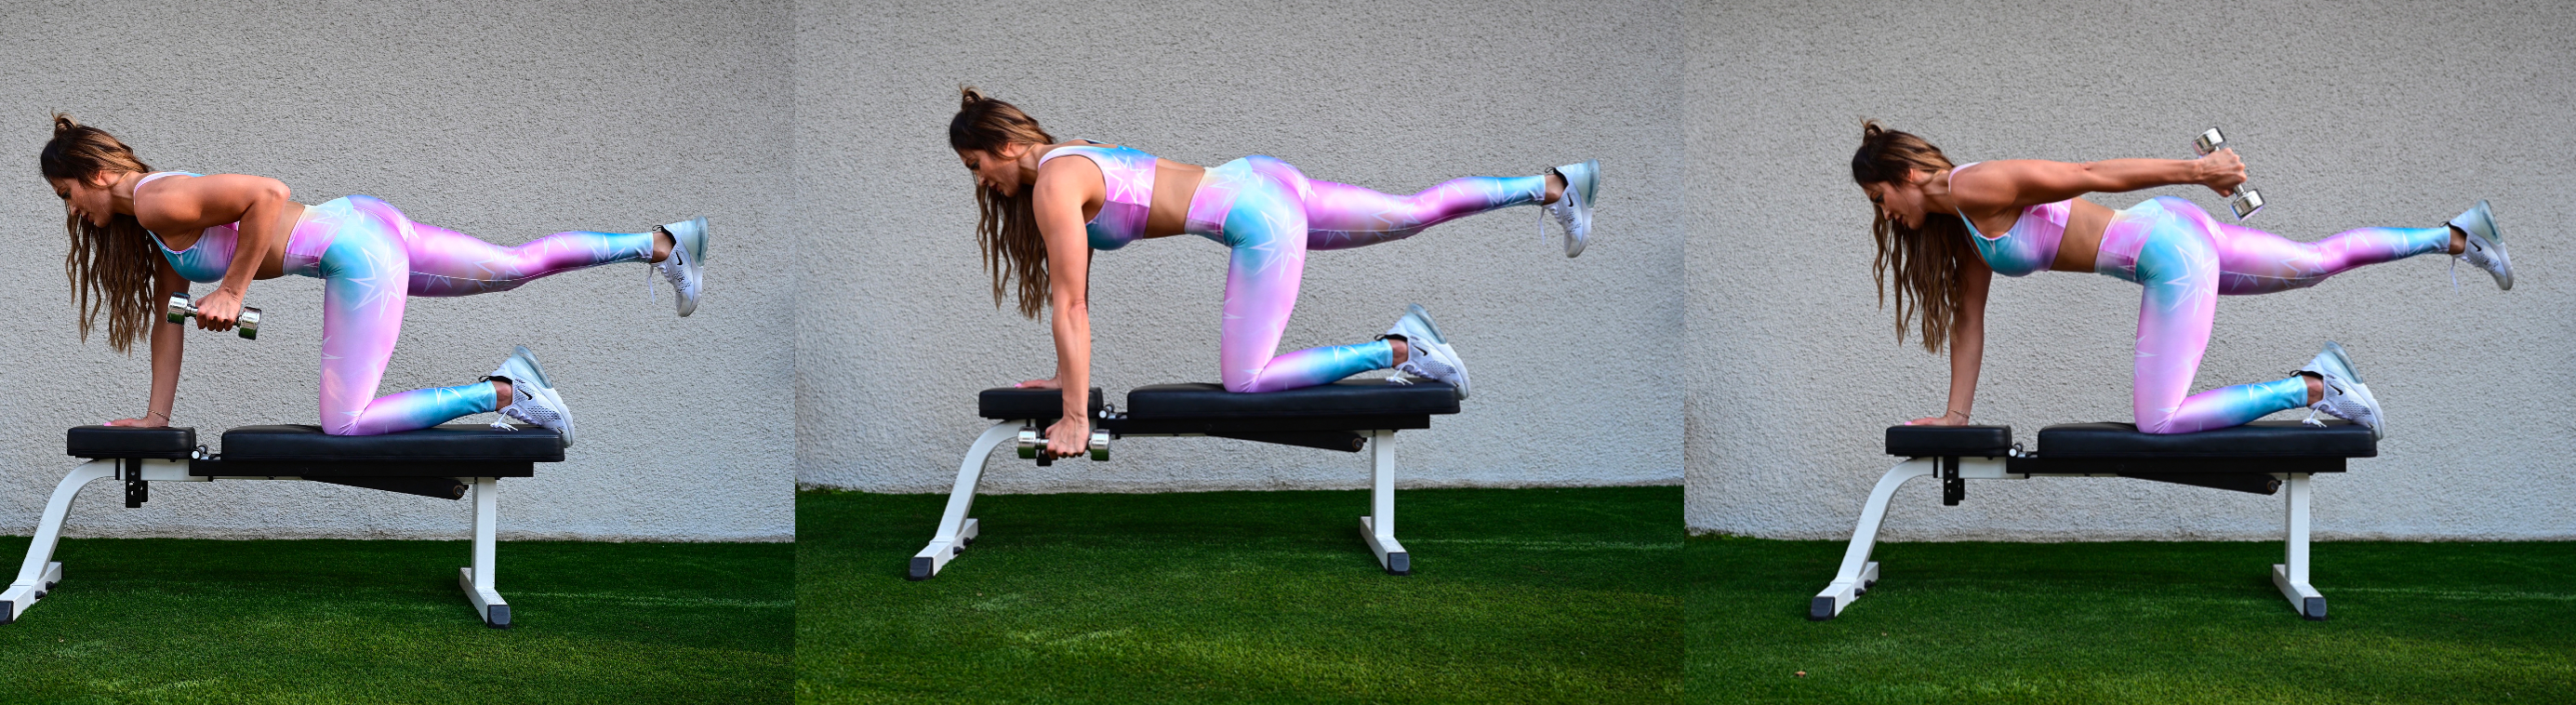
How-To: Place one knee and the opposite-side hand on a flat bench with your other foot extended behind you and elevated, knee straight. In your free hand, hold a dumbbell, arm hanging straight down toward the floor. Now, pull the dumbbell up toward your flank — your elbow should bend and extend above the plane of your back as you shift your shoulder blade inward for a complete contraction. In the top position, “kick” the dumbbell back by straightening your arm, then returning to the elbow-to-90-degree position. Lower the dumbbell back to the start. Repeat for reps — one full row with a kickback in the middle equals one rep — then switch arms and legs and complete your reps on the other side.
Kelly’s Pointers: “This core-stabilizing exercise helps eliminate excessive range of motion and momentum (known as “top rock”) often seen during a traditional row. Your focus during this exercise should be maintaining your core and keeping your bellybutton pointed directly toward the floor. If you prefer a heavier weight for the row versus the triceps extension, separate the movements — do your rows, then switch to a lighter weight and do the extensions.”
Front Raise + Upright Row
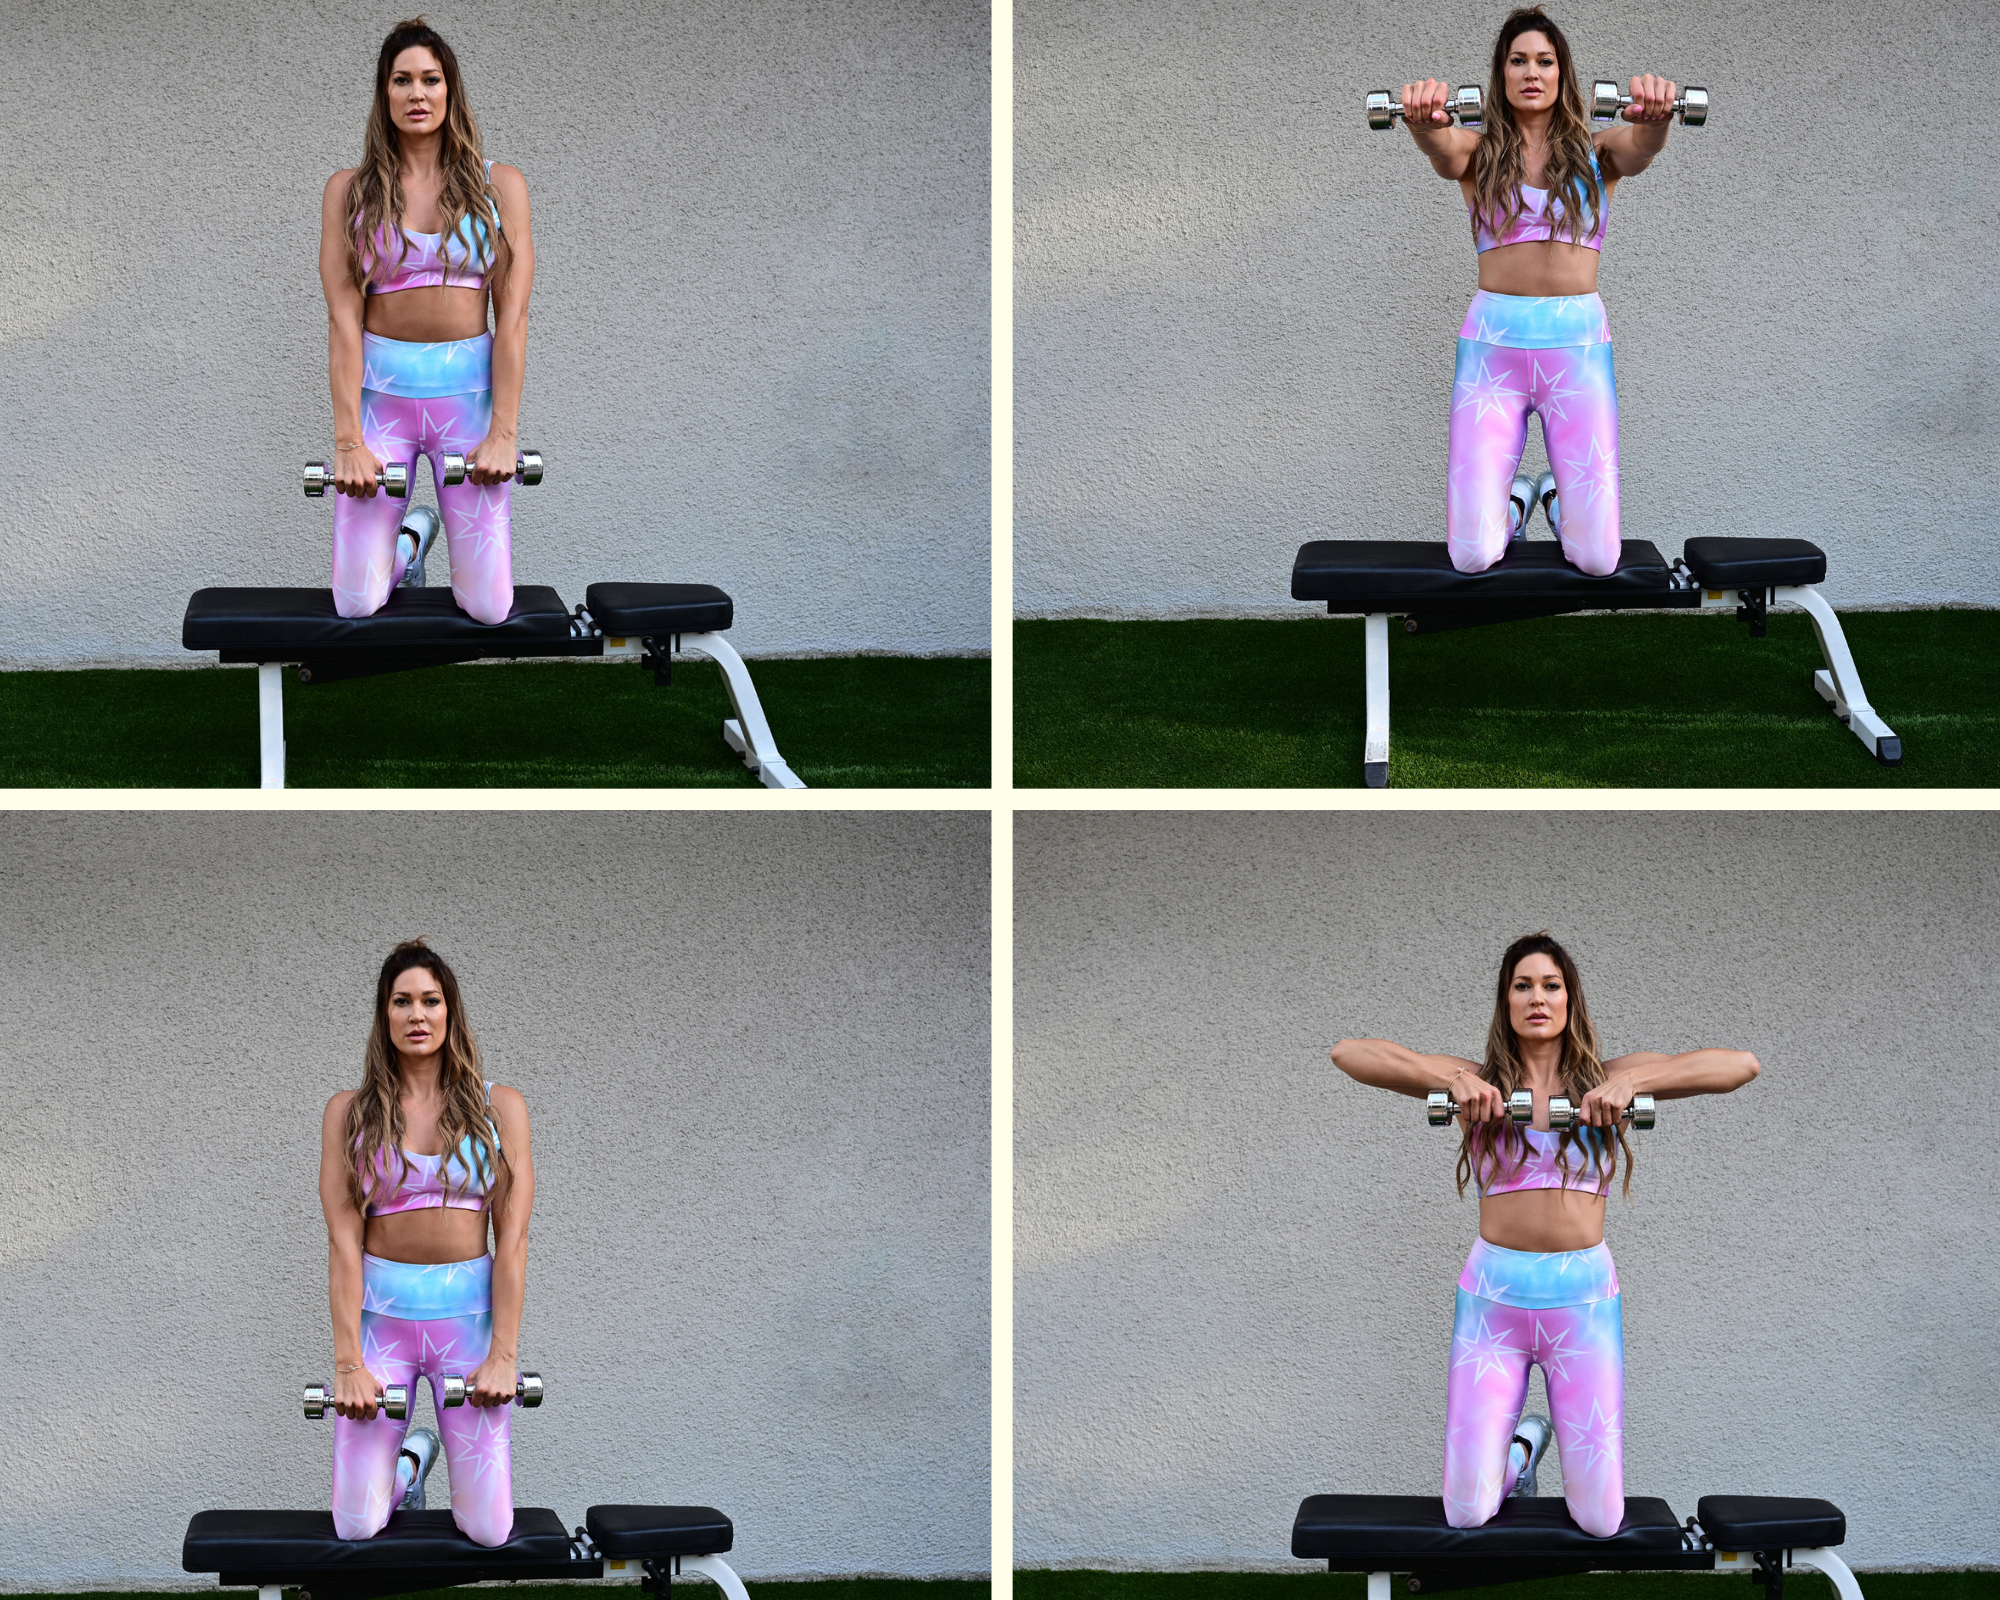
How-To: In a standing position or kneeling on a flat bench (as shown) with a dumbbell in each hand, elbows straight (but not locked), rest the dumbbells directly in front of you on your thighs. If standing, your feet should be shoulder-width apart, abs tight, chest up and shoulders back. Next, raise the dumbbells up directly and simultaneously in front of your body until your arms reach a point parallel to the floor, then lower them to the start. From there, bend your elbows to bring the dumbbells up toward shoulder level — at the top, your elbows should be fully bent and pointing straight out to each side of your body. Lower to the start.
One front raise and one upright row equals one rep.
Kelly’s Pointers: “These two moves sculpt strong, defined shoulder muscles, which helps that tie-in to your upper arms. Maintain a very slight bend in the elbows through the front raise. I recommend going a slow four-count up and four-count down for both exercises. You may consider switching to unilateral, one-arm-at-a-time raises if it’s more comfortable for you or you’re trying to correct a size imbalance between your delts.”
Narrow Chest Press + Ab Toe Touch + Skullcrusher
How-To: For the chest press, lie faceup on a flat bench, legs extended straight up toward the ceiling, holding a dumbbell in each hand at your sides, palms facing you and your elbows next to the bench. Press the dumbbells straight up overhead until the dumbbells are fully extended above your upper chest. Next, you’ll do a weighted toe touch, lifting your glutes and your upper back off the bench to bring the dumbbells in your outstretched arms toward your toes. Once your abs are fully contracted, slowly lower yourself fully onto the bench and then immediately assume a starting position for a dumbbell skullcrusher — dumbbells extended overhead with your elbows straight and your knees bent (but still elevated) for balance. Squeeze your triceps as you slowly lower the dumbbells down toward each side of your head. When you reach a 90-degree angle in your elbows, pause for a moment, then strongly extend your arms and press the weights back to the starting position. Those three movements in combination equal one rep.
Kelly’s Pointers: “During the chest press, you want the dumbbells to nearly touch your chest in the bottom position and squeeze the dumbbells together at the top of the movement. For the skullcrushers, the very slow lowering motion will obliterate the triceps. Bending only at the elbows, lower the dumbbells until they are nearly at your shoulders without allowing your elbows to shift backward — take at least three seconds to do this. Without letting your elbows flare out, pull your upper arms back in line with your torso, with the weights near your rib cage positioned for the next close-grip bench press.”
Optional Burnout: Woodchop + Mountain Climber + Plank
Kelly’s Woodchop Pointers: “This is another fun core-stabilizing arm exercise that will light your abs on fire! To do it properly, you first want to make sure you have the right weight, which might be slightly lighter than your usual go-to. Ensure to articulate through the shoulders and hips so that the core can stabilize the spine and help move the dumbbell across your body properly. Maintain a tight core throughout the movement so when you’re taking that ‘heavy ax’ up toward the top of the tree trunk, you use your core to swipe it across to cut that tree down. Rotate through the balls of your feet. If you want to ramp up the movement, you can add a lunge at each end of the woodchop.”